pu-robot-kit-case-08
sidebar_position: 17
sidebar_label: "Lesson 8: Introduction to Conditionals — Robot Obstacle Avoidance"
Case 08: Introduction to Conditionals — Robot Obstacle Avoidance
Case Introduction
Building on prior knowledge of sequential execution, loop blocks, and variables, this lesson guides students to learn the conditional (if…then…else…) block in MakeCode. Through Robot PU's ultrasonic sensor obstacle avoidance feature, students will understand the logic of "detect obstacle → execute corresponding action," write an obstacle-avoidance program, and give the robot basic autonomous decision-making capability. This lesson develops logical thinking and problem-solving skills, and lays the foundation for more advanced integrated programming projects.
Teaching Materials
| Item | Illustration |
|---|---|
| PU Robot Kit |  |
| Programming Device (Computer) | |
| Flat Surface | |
| Obstacles (Building Blocks / Books) |
Course Objectives
Understand the concept of conditional judgment and master the function and usage of the "if…then…else…" block in MakeCode.
Understand the basic working principle of Robot PU's ultrasonic sensor, and be able to read ultrasonic detection results and set a distance threshold in MakeCode.
Combine the conditional block with the ultrasonic sensor to write an obstacle-avoidance program: "if an obstacle is detected, stop and turn; otherwise, continue moving forward."
Understand that the conditional structure is the key that moves a program from "sequential execution" to "autonomous decision-making", and develop logical thinking and problem-solving skills.
Course Introduction
In the previous lessons, every robot action was pre-arranged — executed step by step in sequence, following instructions no matter what happened. But a truly smart robot should be able to see the situation, judge for itself, and react!
Today, we are going to give our robot "eyes" — the ultrasonic sensor — and teach it the "if… then…" logic. When it encounters an obstacle, it will decide for itself what to do, transforming from an "obedient executor" into a "thinking little robot"!
Learning Exploration
1. Review Prior Knowledge and Introduce the New Need
Recap the use of loop blocks and variables. Play a short demo of the robot moving straight ahead and bumping into an obstacle. Ask the class:
"Why doesn't the robot avoid the obstacle? What ability does it lack?"
Guide students to realize: the robot needs the ability to sense the environment → judge the situation → execute the corresponding action, leading into the topic of conditional judgment.
2. Understanding the Ultrasonic Sensor
Introduce the basic operating principle of Robot PU's ultrasonic sensor:
- The sensor emits a sound wave forward; the wave bounces back when it hits an obstacle; the sensor calculates the round-trip time to determine the distance to the obstacle.
- In MakeCode, the "ultrasonic detection" block can read the distance to an obstacle in real time (unit: cm).
- Demo: Hold your hand at different distances in front of the robot and observe how the ultrasonic reading changes in MakeCode — "the closer the object, the smaller the value."
- Key question: "If we set a distance threshold — when the reading is less than that value, we consider an obstacle to be detected — what action should be triggered?"
3. New Block — Conditional Judgment
Focus on the "if…then…else…" block in MakeCode:
- Structure: The conditional block has three parts — the condition (a true/false expression), the then branch (actions executed when the condition is true), and the else branch (actions executed when the condition is false).
- Real-life analogy: Just like deciding before leaving home — "If it's raining, take an umbrella; otherwise, don't" — the robot can make decisions using the same logic.
- Combined with loops: Explain that conditionals are typically nested inside a "forever" loop for continuous sensing, not checked just once. "The loop makes the robot keep 'looking'; the conditional makes the robot keep 'thinking'."
- Demo: Use
"ultrasonic reading < 10"as the condition; set the then branch (stop + turn) and the else branch (continue forward) with the corresponding blocks.
4. Designing the Obstacle-Avoidance Logic
Guide students to map out the program logic using a flowchart:
       Start
         ↓
    Forever loop
         ↓
  Read ultrasonic distance
         ↓
   Distance < 10 cm?
    /           \
  Yes            No
   ↓              ↓
  Stop        Keep moving forward
   ↓
  Turn
   ↓
Continue loop
Have students use the flowchart as a reference to translate the logic step by step into MakeCode blocks, building the understanding of "flowchart → program."
- Group Programming & Actual Testing: Each group sets blocks as obstacles on the desktop or ground, and completes the following tasks:
- Basic Task: Write an obstacle avoidance program to realize "detect an obstacle (distance < 10cm) → stop → turn right 90° → keep moving forward", and test whether the robot can successfully bypass a single obstacle;
- Each group conducts repeated tests and adjusts the turning angle to ensure the robot can move forward normally after avoiding obstacles, cultivating debugging and problem-solving abilities.
MakeCode Programming
Program 1: Detect the Distance to Obstacles

Program Link: https://makecode.microbit.org/_RfC1cCfL2ikA
Program 2: Stop and Turn When Obstacle is Detected
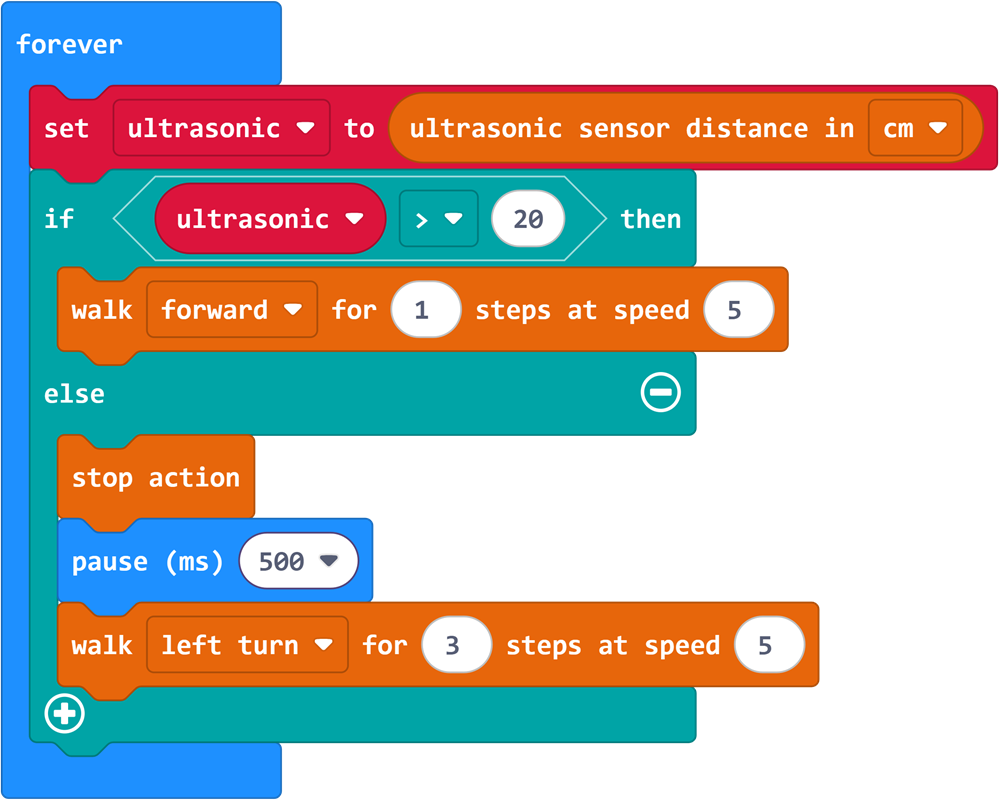
Program Link: https://makecode.microbit.org/_1ofLLt7iVJ3M
Summary & Sharing
Invite each group to demonstrate the obstacle avoidance effect and share the problems encountered and solutions during debugging: How do different distance thresholds affect the robot’s obstacle avoidance behavior? What are the differences and connections between the conditional judgment module and the previously learned sequential execution and loop modules? Combining students’ sharing, the teacher summarizes the relationship between the three core program structures:
Sequential execution lets the robot "do things step by step";
Loops let the robot "keep doing things repeatedly";
Conditional judgment lets the robot "decide what to do according to the situation";
Combined, the three structures enable the robot to complete more complex and intelligent tasks. Preview that subsequent courses will comprehensively use these three structures to challenge more complex programming projects.