Case 05: Burning System Image
Introduction
This course aims to introduce students to the operation of updating system image.
 Note: After XGO Rider is turned on, it needs to move back and forth slightly to keep the fuselage balanced. Please do not place XGO Rider on the edge of the table or in dangerous places to avoid damage. At the same time, the TF card of XGO Rider is burned with the image at the factory. You can directly insert the TF card into the Raspberry Pi for use. In general, there is no need to burn the image system according to this tutorial! ! !
Teaching Objectives
Understand the operation of updating the system image.
Teaching Preparation
Before starting the teaching, please make sure you have prepared the following necessary materials:
| Picture | Name | Quantity | Note |
|---|---|---|---|
 | CM4 XGO Rider | 1 | |
 | PC | 1 | Prepare Yourself |
Course Introduction
With the upgrade of technology and the increase of our product functions, you may need to update the system image. Next, let's start the learning journey.
Exploration Activities
How to burn the system image correctly.
Software
Note: After XGO Rider is turned on, it needs to move back and forth slightly to keep the body balanced. Please do not place XGO Rider on the edge of the table or in dangerous places to avoid damage.
1. Preparation
Hardware: Prepare an SD card reader, which needs to be USB 3.0. Pull out the SD card of the robot dog and insert it into the card reader, and then plug it into the USB port of the computer.
Software: Download Raspberry Pi Imager and install it.
2. Start Raspberry Pi Imager
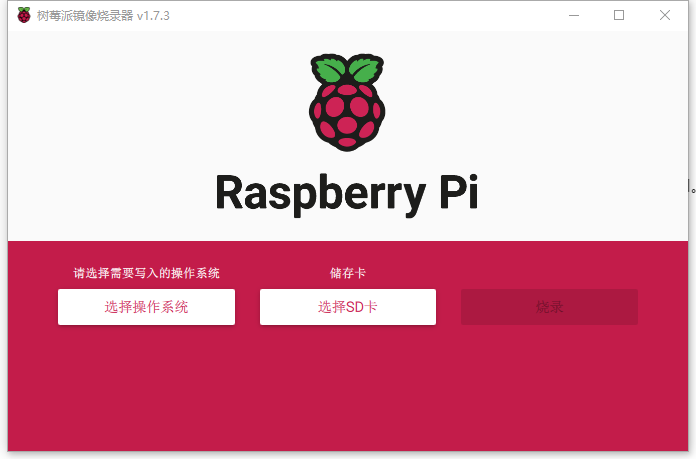
3. Select the operating system and image file
Download the latest Raspberry Pi system image, click "Select operating system" and choose to use a custom image and storage card path.
Click Burn, and it will be completed in about 20 minutes.
Note that the system will prompt you to format, do not format the SD card.