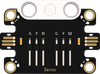
Micro:bit Related ProductsJacdac SeriesJacdac Energy Experiment KitCase 7: Dutch WindmillOn this pageCase 7: Dutch WindmillIntroductionPress button A on the micro:bit V2 board, and the 360° building-block servo begins rotating continuously in a single direction, driving the windmill blades — simulating a Dutch windmill in operation. Press button B on the micro:bit V2 board, and the servo stops rotating.Learning ObjectivesLearn about the 360° building-block servo module and understand how it differs from a standard servo.Learn the concept of event-driven programming — controlling program start and stop through button events.Understand sequential execution structure — code runs in the order it is written.Explore the history, culture, and wind energy utilization of Dutch windmills.Required MaterialsItemImageQuantitymicro:bit V21Jacdac Expansion Board1Jacdac 25cm Connector Cable1Jacdac Servo Module1360° Building-Block Servo1USB Cable1Jacdac Energy Practice Kit Building Blocks1Assembly StepsModel Principle360° Building-Block Servo ModuleThe 360° building-block servo (continuous rotation servo) differs from a standard 180° servo: a standard servo only rotates to a specified angular position (e.g., 0°–180°), whereas a 360° building-block servo can rotate continuously. Its rotation direction and speed are controlled by setting a speed value — positive values for forward rotation, negative for reverse, and 0 for stop. It is ideal for simulating scenarios that require continuous rotation, such as windmills and wheels.Dutch WindmillThe Dutch windmill is an iconic symbol of the Netherlands, first appearing in the 13th century. The Netherlands is a low-lying country — known as the "Low Countries" — with approximately one-quarter of its land below sea level. Windmills were initially used primarily for drainage and land reclamation — pumping water out of low-lying areas to turn marshes into arable farmland. Over time, windmill applications expanded to include grinding grain, pressing oil, sawing wood, and other industrial uses, making them the "power engine" of Dutch history.Sensor PrincipleThis case does not use an external sensor module; control is achieved entirely through the built-in button A and button B of the micro:bit V2 board.Connection DiagramAs shown below, insert the micro:bit V2 board into the Jacdac expansion board, and connect the 360° building-block servo module to the Jacdac expansion board's edge connector.Programming SoftwareMicrosoft MakeCodeMakeCode ProgrammingStep 1: Adding the Jacdac ExtensionGo to Microsoft MakeCode and click "New Project".Enter a project name in the pop-up window and click "Create".Click "Extensions" in the code drawer.In the pop-up interface, type "Jacdac" and click the search icon, then select the Jacdac software library as shown.Step 2: Connecting the HardwareUse a USB cable to connect the micro:bit V2 board to the computer.Note: If this is the first time running a Jacdac program on the micro:bit V2, please pre-load a blank Jacdac program onto the board first. Otherwise, skip this step.Connect the sensor. MakeCode will automatically detect and simulate it in the simulator area, where sensor status is displayed in real time.Click "ADD BLOCKS" to add the sensor extension module.Note: When connecting a new sensor, repeat the "click 'ADD BLOCKS'" workflow once.Write the Program as ShownReference Program Linkhttps://makecode.microbit.org/_heHEYF3b2Lm5You can also download the program directly from the webpage below. Once downloaded, you can start running the program.ResultPress button A on the micro:bit V2 board, and the 360° building-block servo begins rotating continuously in a single direction, simulating a Dutch windmill spinning in the breeze. Press button B, and the servo stops rotating.ThinkBesides Dutch windmills, what other rotating objects in daily life could be simulated with a 360° building-block servo?If you wanted the windmill to change speed based on "wind strength," how could you modify the program?Program LogicTrigger ConditionActionSourceButton A pressed360° building-block servo rotates continuously at full speed (100) in a single direction, simulating windmill rotationmicro:bit Button AButton B pressed360° building-block servo stops rotating, simulating windmill shutdownmicro:bit Button BKnowledge Extension: Dutch Windmills — From Ancient Wisdom to Modern Wind EnergyI. Windmills — A National Symbol of the NetherlandsWhen people think of the Netherlands, the first things that come to mind are tulips, windmills, and wooden shoes. The windmill became a symbol of the Netherlands because of the country's unique geographic conditions.FactDataDutch land below sea level~26%Highest point in the NetherlandsOnly 322 m above sea level (at the border with Belgium and Germany)Total windmills built in Dutch historyOver 10,000Traditional windmills still standing~1,200Kinderdijk windmill network (UNESCO World Heritage)19 windmills, built around 1740The country's name "Netherlands" literally means "low countries." For centuries, the Dutch used windmills to pump water out of low-lying areas, essentially "seizing" livable land from the sea and marshes. An old Dutch proverb says: "God created the world, but the Dutch created the Netherlands."II. How Windmills WorkA traditional Dutch windmill converts wind energy into mechanical energy through the following steps:Wind → Pushes windmill blades to rotate → Transmits power via main shaft → Gear set adjusts speed →├── Drives waterwheel / Archimedes' screw (drainage)├── Drives millstones (grinding grain)├── Drives oil press (oil extraction)└── Drives sawmill (wood cutting)The top of the windmill (the cap) can rotate 360°, keeping the blades always facing the oncoming wind — this is why Dutch windmills look like "hat-wearing" towers.III. From Windmill to Wind Turbine — A Microcosm of the Energy RevolutionDutch windmills are an early model of humanity's use of renewable energy. Today, wind energy has become one of the world's most important clean energy sources:Global Wind Energy Key DataValue2025 global new wind installations167 GW, up 47% year-on-year2025 global cumulative wind capacity~1,300 GW2024 global wind electricity generation2,494 TWh, 8.1% of global electricityGlobal wind + solar share (2024)Combined 15% of global electricityWorld's largest single wind turbineRated at 26 MW, blade length over 150 metersComparison: A modern large wind turbine (10 MW) generates in one day (~72 MWh) roughly the drainage work that a traditional Dutch windmill would take several months to accomplish. The progress of technology is breathtaking, but ancient wisdom is equally worthy of remembrance.IV. What Dutch Windmills Teach UsLessonExplanationAdapt to local conditionsThe Netherlands is windy and low-lying — windmills were the optimal solution. Good problem-solving leverages local advantages.Live in harmony with natureFacing a harsh geographic environment, the Dutch did not fight nature but adapted to the patterns of wind and water, using wisdom to cooperate with nature in creating living space.Clean energy foresightHundreds of years ago, the Dutch were already using zero-carbon wind energy to power their entire nation's industry and agriculture. The answers to today's global energy transition challenges may well be hidden in historical wisdom.Fusion of technology and cultureWindmills are both production tools and cultural symbols. Good technology should benefit humanity and blend into everyday life.Reflection: From the simple windmills of the 13th century to today's giant offshore wind turbines, the story of humanity harnessing wind energy spans over 800 years. What will future wind energy technology look like? Perhaps its inventor is you — the person learning to code right now.

.png)