Push Button Module(EF05017)
Introduction
The Push button module is able to detect your press action.

Products Link
ELECFREAKS PlanetX Button Sensor
Characteristic
Designed in RJ11 connections, easy to plug.
Specification
| Item | Parameter |
|---|---|
| SKU | EF05017 |
| Connection | RJ11 |
| Connections type | Digit output |
| Power | 3.3V |
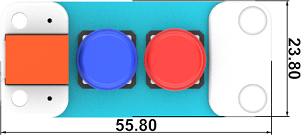
Outlook
Quick to Start
Materials Required and Diagram
Connect the Push-button module to J1 port in the Nezha expansion board as the picture shows.

MakeCode Programming
Step 1
Click "Advanced" in the MakeCode drawer to see more choices.
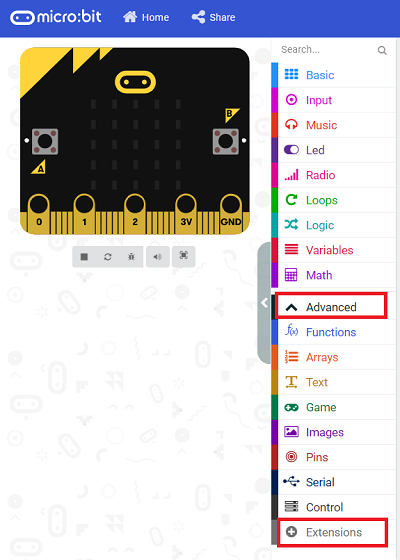
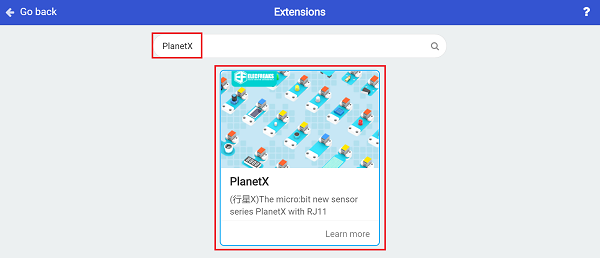
We need to add a package for programming, . Click "Extensions" in the bottom of the drawer and search with "PlanetX" in the dialogue box to download it.
Note: If you met a tip indicating that the codebase will be deleted due to incompatibility, you may continue as the tips say or build a new project in the menu.
Step 2
Code as below:

Link
Link: https://makecode.microbit.org/_7bYWKYccY73R
You may also download it directly below:
Result
The icons display on the micro:bit accordingly with the order given by pressing button A or B or A+B.
Python Programming
Step 1
Download the package and unzip it: PlanetX_MicroPython
Go to Python editor

We need to add enum.py and button.py for programming. Click "Load/Save" and then click "Show Files (1)" to see more choices, click "Add file" to add enum.py and button.py from the unzipped package of PlanetX_MicroPython.


Step 2
Reference
from microbit import *
from enum import *
from button import *

button = BUTTON(J1)
while True:
    if button.A_is_pressed():
        display.show(Image.HAPPY)
    elif button.B_is_pressed():
        display.show(Image.SAD)
    elif button.AB_is_pressed():
        display.show(Image.COW)
        sleep(500)
Result
The icons display on the micro:bit accordingly with the order given by pressing button A or B or A+B.