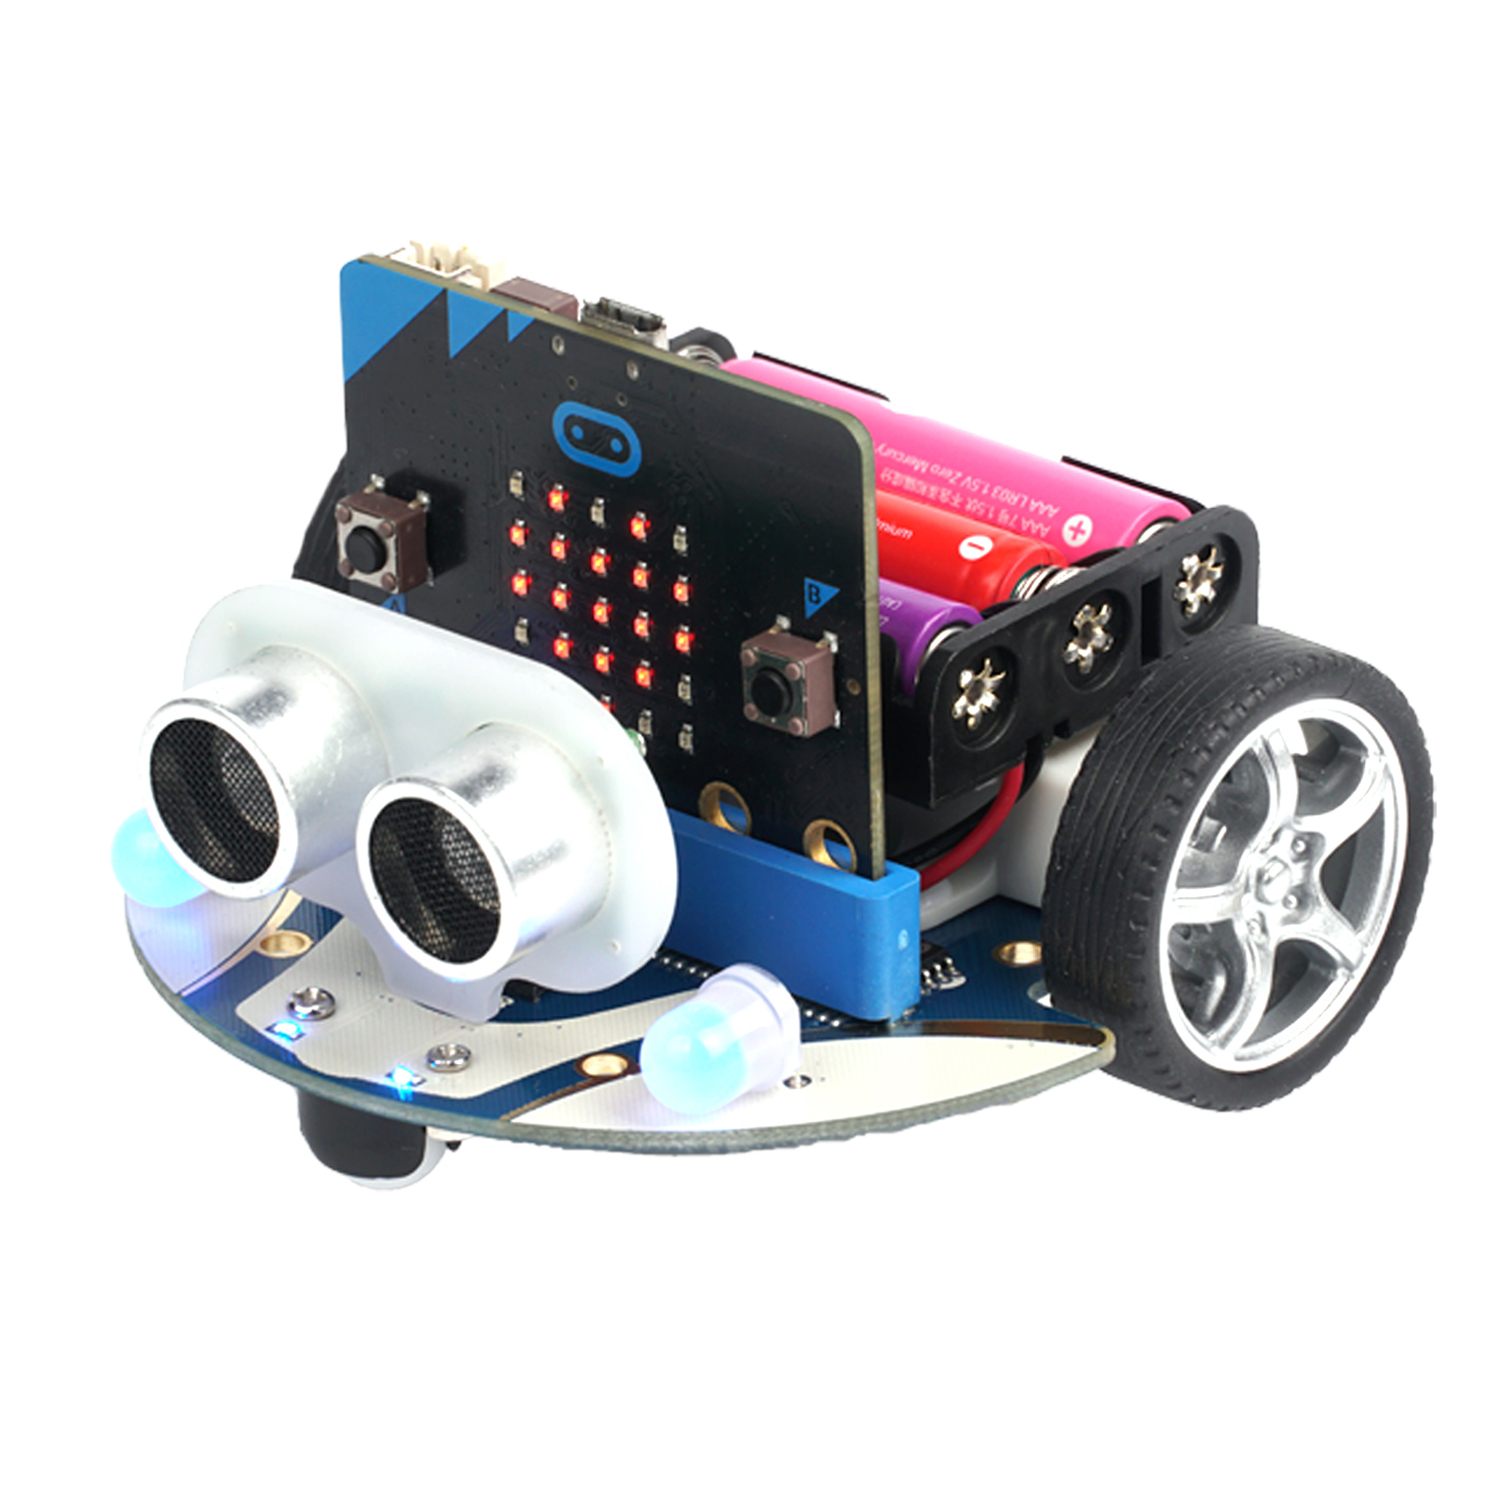
Meet the Cutebot Car
Lesson Description
In this lesson, we will have a brief look at what the cutebot car has to offer, and learn how to program the cutebot car through a simple case study.
Lesson Preparation
| Picture | Name | Number | Notes |
|---|---|---|---|
 | cutebot | 1 | |
 | AAA battery | 3 | Prepare Yourself |
 | USB Cable | 1 | |
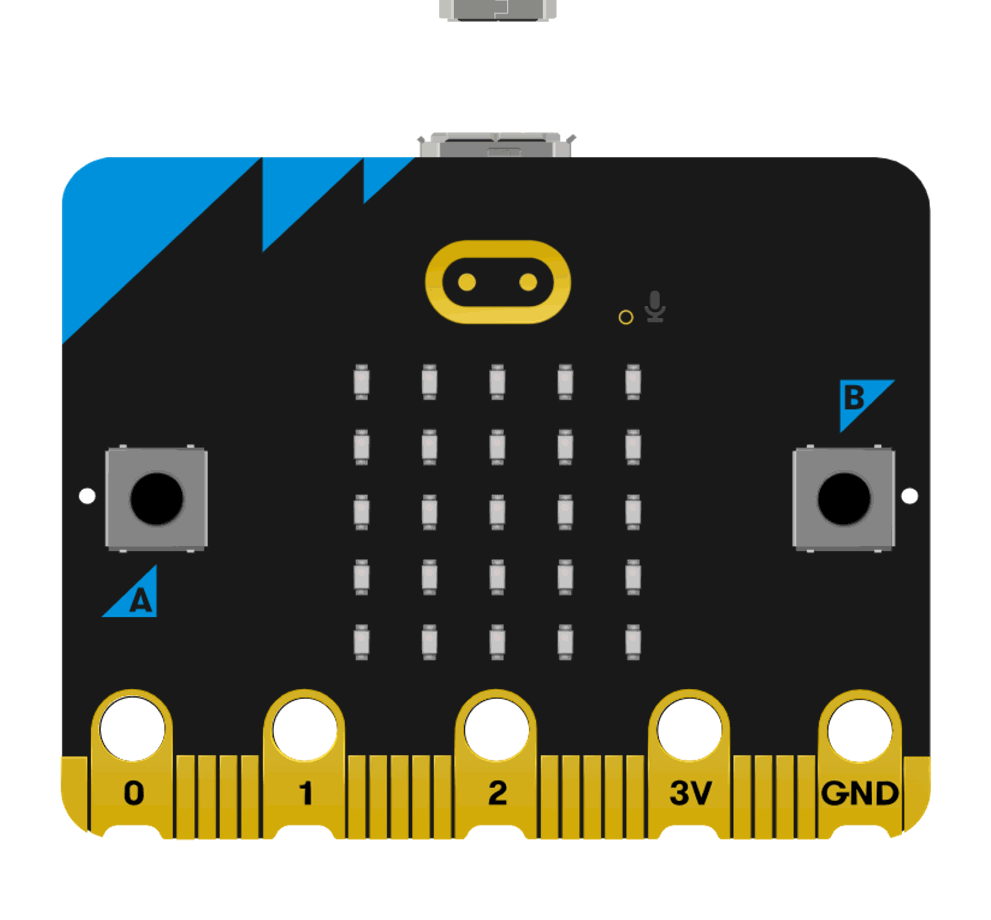
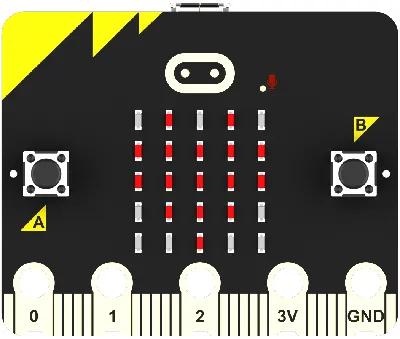 | micro:bit | 21 | Prepare Yourself |
 | PC | 1 | Prepare Yourself |
cutebot introduction
ELECFREAKS Cutebot is a rear-wheel drive smart racing car with dual high-speed motor motors.
Cutebot is equipped with many on-board devices at the same time, including ultrasonic navigation distance sensor, two RGBLED headlights, two Rainbow LED underbody outline lights, and two lane-assisted patrol probes.
Function module description
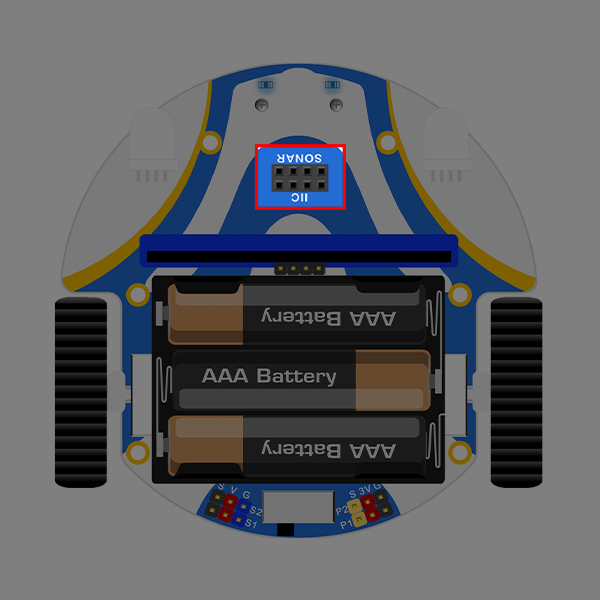
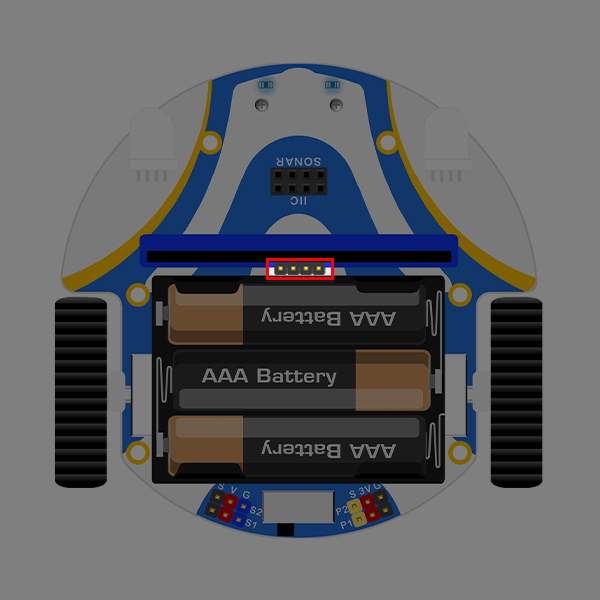
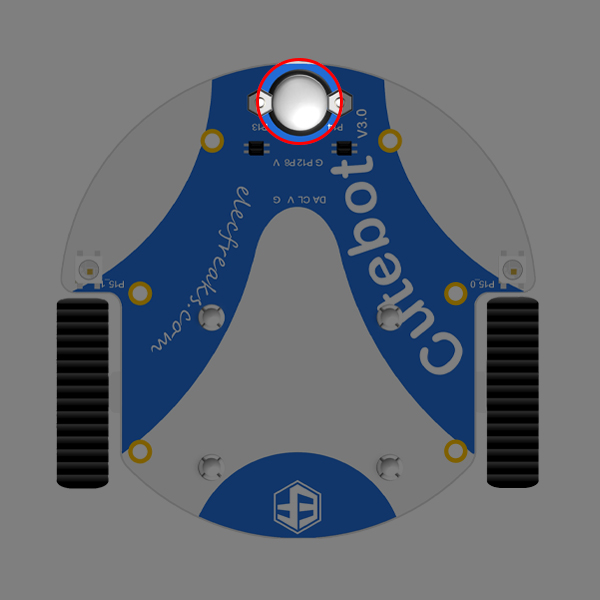
The car is equipped with an ultrasonic interface and a micro: bit IIC interface in front of it
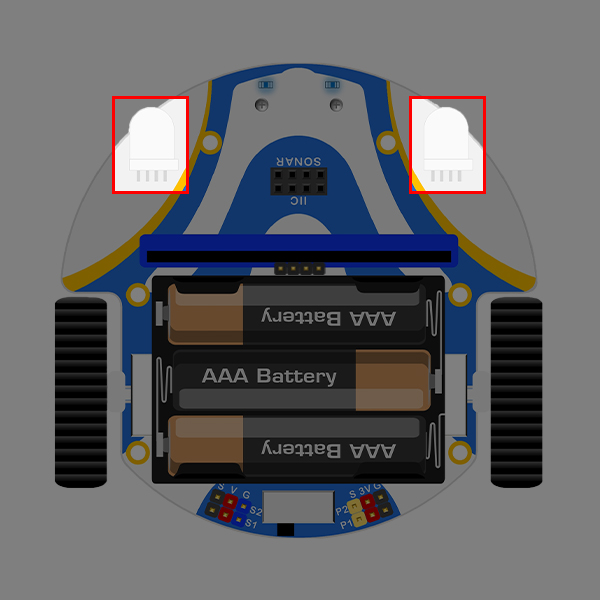
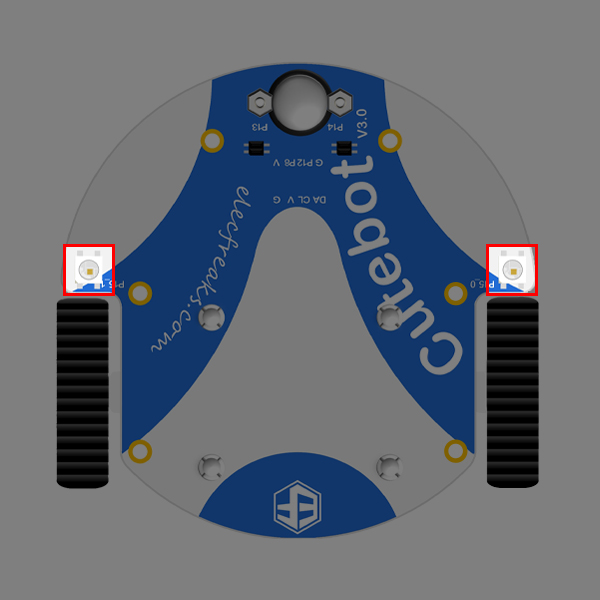
Two RGB full-color LED headlights are equipped on each side of the front, which are controlled through an expansion board and do not occupy the number of micro: bit IO ports.
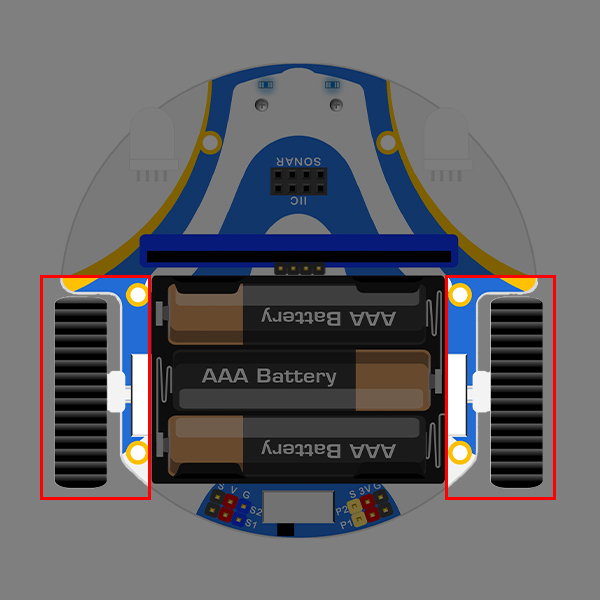
There are three AA battery pack expansion boards installed directly above, which are used to drive the entire car.

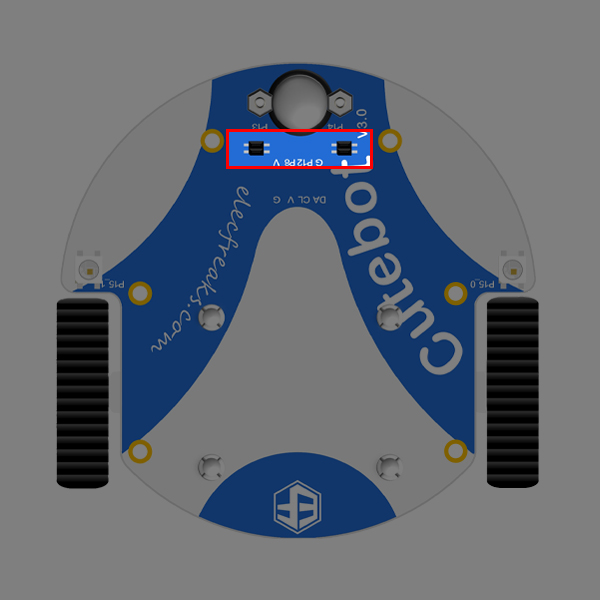
The expansion board of the battery pack also includes S1 and S2 servo interfaces, as well as P1 and P2 IO interfaces.
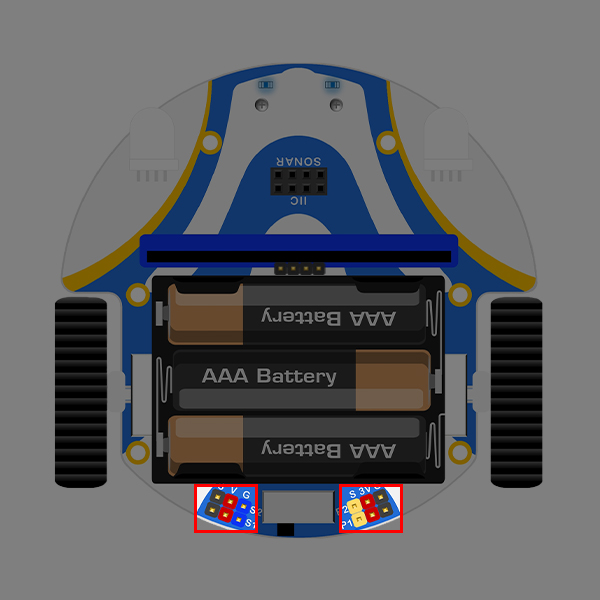
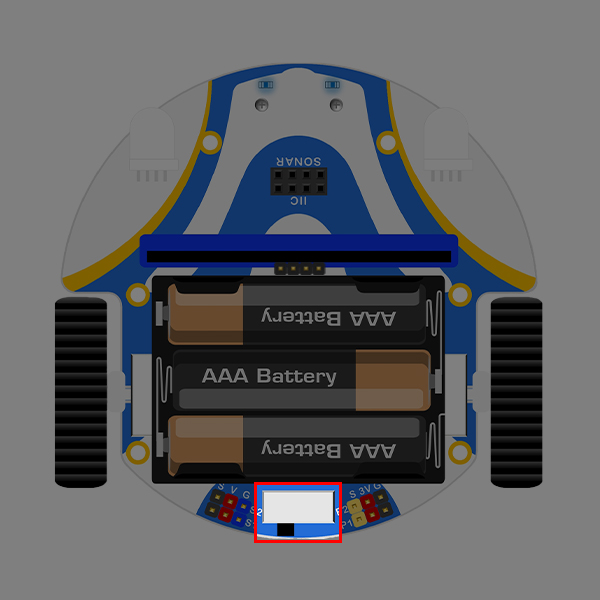
The rear of the car is equipped with an infrared receiver head (under the battery box), which is connected to the P16 interface of the micro: bit.
The car is equipped with an IIC interface for connecting AI cameras.
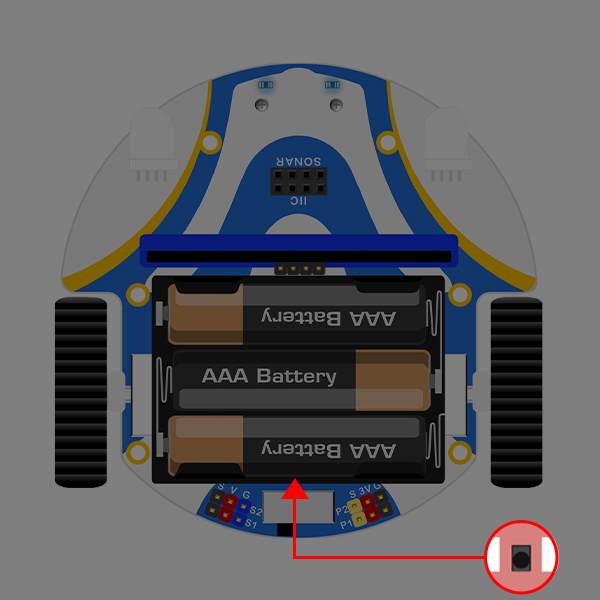
Next to the rear infrared receiver is the main power switch of the car, and there is also an LED light indicating the status of the switch.
On both sides are two miniature high-speed DC gear reduction motors driving the wheels, with a speed of up to 300 revolutions per minute, enjoying a flying speed.
There are two line inspection heads at the front of the bottom of the car, used to detect black lines and edges, connected to the P13 and P14 interfaces of the micro: bit.
A metal universal wheel is installed at the front of the bottom of the car, and the car travels 360 degrees in all directions using the speed difference between the left and right wheels.
Two Rainbow LED full-color light beads are mounted on the bottom two side edges, connected to the P15 port of the micro:bit motherboard, and need to use the expansion Neopixel to drive the use of it, which can be used as a small car outline light or other functions.
Quick start
Preparation
Plug the battery pack's power cord into the cutebot.
Stick 3M double-sided tape onto the battery box.

Stick the battery box onto the Cutebot smart racing car.

Programming platforms
We usually use graphical programming platform makecode to program the micro:bit.
Programming platform entry: https://makecode.microbit.org/
Create a new project
Open [https://makecode.microbit.org/
New project
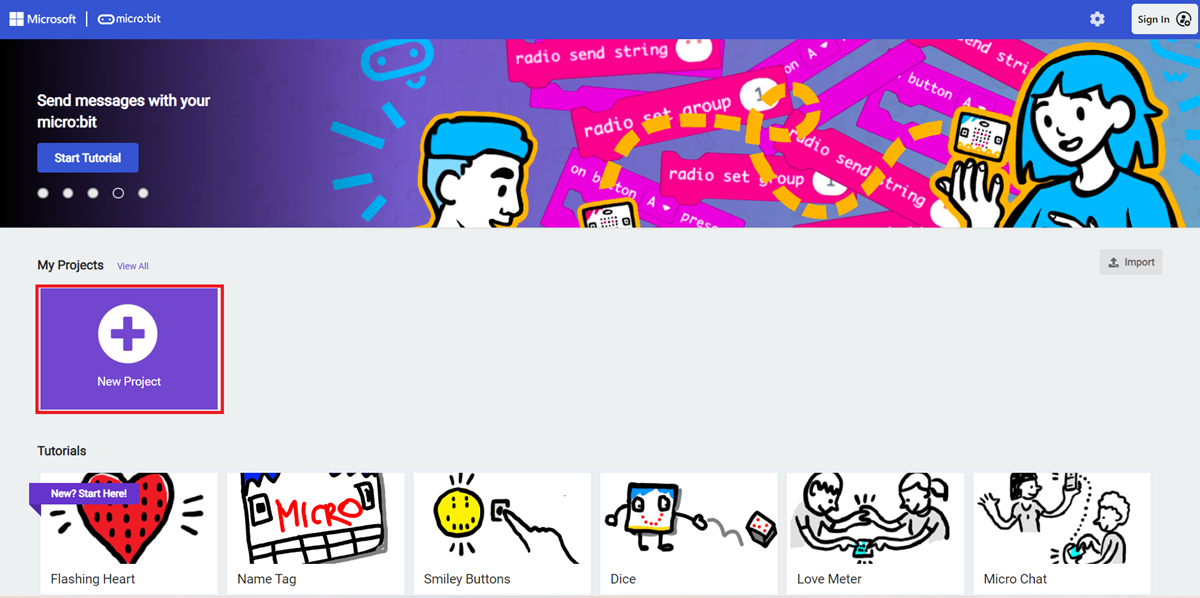
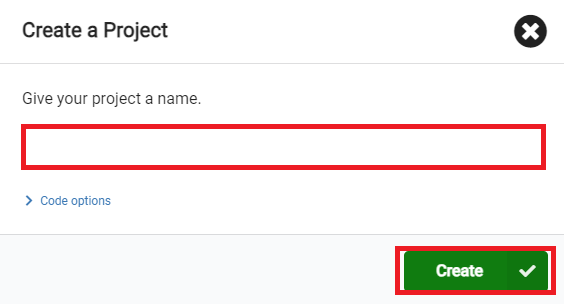
Enter the project name and click Create.
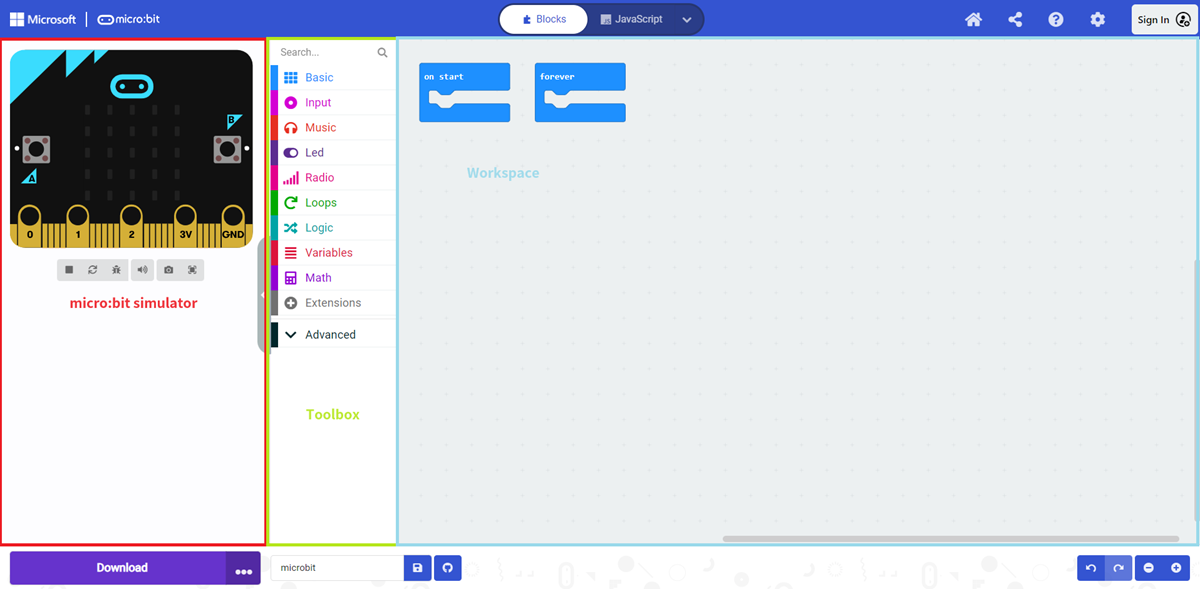
After entering the editor interface, we can see Micro: bit Simulator, Toolbox,Workspace.
Add software library
Click on "Extensions" in the Toolbox of the makecode programming interface.

Search for cutbot on the pop-up page and click to select the cutbot repository.

Software Blocks Explanation
| Block | Founction | Parameter |
|---|---|---|
 | Set the speed of the left or right wheel of the car | Parameter 1: Value Value range: -100~100 Parameter 2: Value Value range: -100~100 |
 | Set the car to run at a fixed speed in a certain direction for a specified time | Parameter 1: Drop down options Available options: Forward, Backward, Left, Right Parameter 2: Integer Value range is -100~100 Parameter 3: Natural numbers |
 | Set the car to move forward at full speed | |
 | Set the car to move backwards at full speed | |
 | Set the car to turn left at full speed | |
 | Set the car to turn right at full speed | |
 | 设置小车立刻停车 | |
 | Set the car to stop immediately | Parameter 1: dropdown options optional: right RGB, left RGB, all Parameter 2: dropdown options options:  |
 | Set the color of the car headlights in RGB mode | Parameter 1: dropdown options optional: right RGB, left RGB, all Parameter 2: natural numbers numerical range: 0~255 Parameter 3: natural numbers numerical range: 0~255 Parameter 4: natural numbers numerical range: 0~255 |
 | Turn off the car headlights | |
 | Determine the status of two line patrol sensors | Parameter 1: Drop down options Available options: Black Black, White Black, Black White, White White |
 | Determine the status of two line patrol sensors separately | Parameter 1: dropdown options optional: left, right Parameter 2: dropdown options optional: found, lost |
 | When the patrol head of the car detects the corresponding status, execute the internal program | Parameter 1: dropdown options optional: left, right Parameter 2: dropdown options optional: found, lost |
 | Detect the distance of obstacles in front of the car | Parameter 1: Drop down options Available options: centimeters, inches |
 | Set the 180 ° servo connected to the specified interface to rotate to the specified angle | Parameter 1: Drop down options Available options: S1, S2 Parameter 2: Natural numbers Value range: 0~180 |
 | When receiving infrared signals, execute internal programs | |
 | Determine the received infrared signal information | Parameter 1: Drop down options Available options: Menu Up、Left、Right、Down、OK、Plus、Minus、Back、0、1、2、3、4、5、6、7、8、9 |
Software Building Blocks Introduction and Examples
Sets the speed of the left or right wheel of the cart.
Sample Programs:https://makecode.microbit.org/_bV3cyW8JDPp7

You can also download the program directly from the following webpage.
How to download programs to micro: bit?
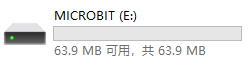
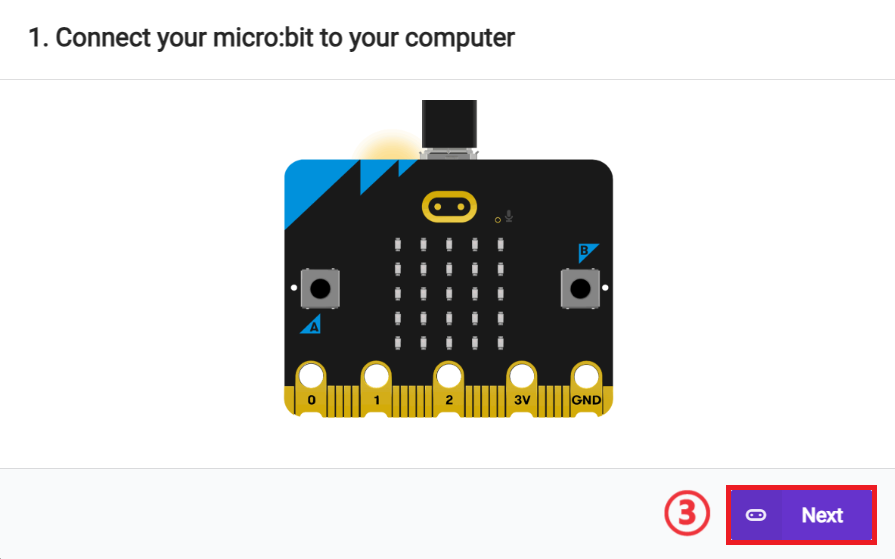
Connect the PC and micro: bit V2 using a USB cable.
After a successful connection, a disk drive named MICROBIT will be recognized on the computer.
Click on the bottom left corner of the ,and select
 Connect Device.
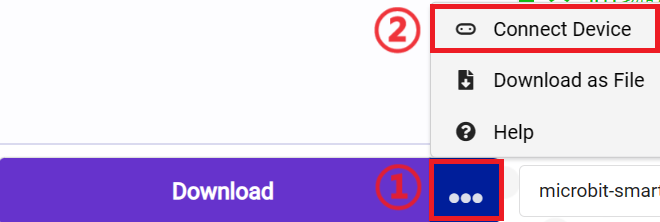
Click 。
。
Click
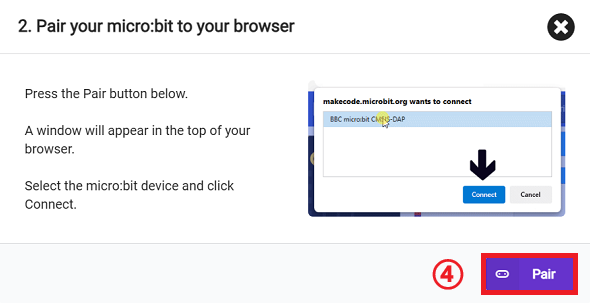
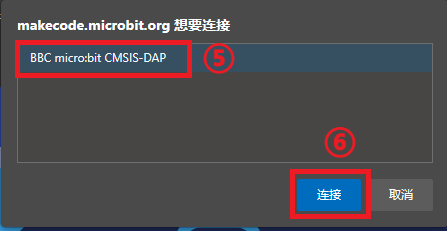
Select BBC micro:bit CMSIS-DAP in the pop-up window and then select Connect, and at this point, our micro:bit has connected successfully.
Click to download the program.

Result
Pressing key A of micro:bit moves the cart forward at 100%.
sets the cart to run at a fixed speed in a certain direction for a specified time.
Sample Program:https://makecode.microbit.org/_6sc5d0ij3WL9

你也可以通过以下网页直接下载程序。
*** Result: After pressing button A, the cart travels forward at 50% for 5 seconds and then stops. ***Set the cart to move forward at full speed.
Sample Program :https://makecode.microbit.org/_eup6qgbb2gYz

You can also download the program directly from the following web.
*** RESULT: The trolley moves at full speed when button A is pressed. ***Set the cart to go backward at full speed.
Sample program :https://makecode.microbit.org/_acjeice30TKp

You can also download the program directly from the following web.
*** RESULT: When button A is pressed, the trolley goes backward at full speed. ***Set the cart to turn left at full speed.
Sample program :https://makecode.microbit.org/_0PfPA7f83Rmo

You can also download the program directly from the following web.
*** RESULT: After pressing key A, the trolley turns to the left. ***Set the cart to turn right at full speed.
Sample program :https://makecode.microbit.org/_Pz2ebkPvH8p1

You can also download the program directly from the following web.
*** RESULT: The trolley turns to the right when button A is pressed. ***Set the cart to stop immediately.
Sample program :https://makecode.microbit.org/_XDDPKvarbfrK
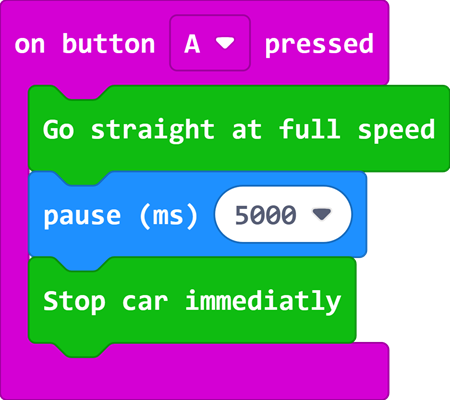
You can also download the program directly from the following web.
*** Result: After pressing button A, the cart travels forward at full speed for 5 seconds and then stops. ***Set the headlight of the cart to the preset color.
Sample program :https://makecode.microbit.org/_FxxXC2e6LTHF

You can also download the program directly from the following web.
*** RESULT: When button A is pressed, the trolley LED headlight shows red. ***Set the cart headlight color in RGB mode.
Sample program :https://makecode.microbit.org/_DJTUyJiesU9q

You can also download the program directly from the following web.
*** Result: The LED headlight of the trolley shows green when button A is pressed. ***Turn off the cart headlight.
Sample Program :https://makecode.microbit.org/_ersCDADdWWV4

You can also download the program directly from the following web.
*** Result: When the power is turned on, the trolley headlight shows blue light, and when key A is pressed, the trolley LED headlight goes out. ***Determine the status of the two roving sensors.
Sample program :https://makecode.microbit.org/_8dbgTr2ku0Ko

You can also download the program directly from the following web.
*** RESULTS: After turning on the power, the micro:bit displays a heart icon when both of the cart's roving heads detect a black area, and the micro:bit displays a smiley face icon when both of the cart's roving heads detect a white area. ***Judge the status of the two rover sensors respectively.
Sample Program :https://makecode.microbit.org/_PwmF7fP6agxC

You can also download the program directly from the following web.
*** RESULTS: After power on, the micro:bit displays a heart icon when all black lines are detected on the left side of the trolley's roving head, and a smiley face icon when all black lines are detected on the right side of the trolley's roving head. ***Execute the internal program when the wire patrol head of the cart detects the corresponding state.
Example program:https://makecode.microbit.org/_cpLdyi79t9pb

You can also download the program directly from the following web.
*** Result: after power on, micro:bit displays the love heart icon when all the black lines are detected by the patrol head on the left side of the cart ***Detect the distance of obstacles in front of the cart.
Example program:https://makecode.microbit.org/_czUc7rFp4Eu2

You can also download the program directly from the following web.
*** Result: micro:bit displays the distance between the obstacle in front of the trolley and the trolley when the power is turned on ***Set the 180° servo connected to the specified interface to rotate to the specified angle.
Sample Program:https://makecode.microbit.org/_99PFCsWEFbTR

You can also download the program directly from the following web.
*** Result: Control the rotation angle of the servo connected to S1 by means of the A and B buttons. ***Execute internal program when IR signal is received.
Note: This case needs to be tested with an IR remote controller.
Example program :https://makecode.microbit.org/_LV7E45CaML5t

You can also download the program directly from the following web.
*** Result: When an infrared signal is received, the heart icon is displayed. ***Judge the information of received IR signal.
Note: This case needs to be tested with an infrared remote controller.
Example program :https://makecode.microbit.org/_7hm0LUXxAYjR

You can also download the program directly from the following web.
*** Result: A smiley face icon is displayed when an infrared signal is received that the Menu has been pressed. ***For more examples of cutebot, please check out the:https://wiki.elecfreaks.com/en/microbit/microbit-smart-car/microbit-smart-cutebot/