How to Adapt to the HiveMQ Platform
HiveMQ is an MQTT broker and client-based messaging platform designed to move data to and from connected IoT devices quickly, efficiently and reliably.
HiveMQ link: https://www.hivemq.com/.
HiveMQ Account Registration
Go to the HiveMQ website, and click on Cloud on the menu bar in the upper right corner.

Click on the pop-up page to select Try out for free.

Click on the pop-up page to select sign, enter your registration information (email, password), and then click SIGN UP.

Here you need to pay attention to the password input requirements

Then follow the platform registration guide to register your account.
HiveMQ Operation Guide
After successful registration, enter the URL: https://www.hivemq.com/mqtt-cloud-broker/ Click on the pop-up page to select sign up now
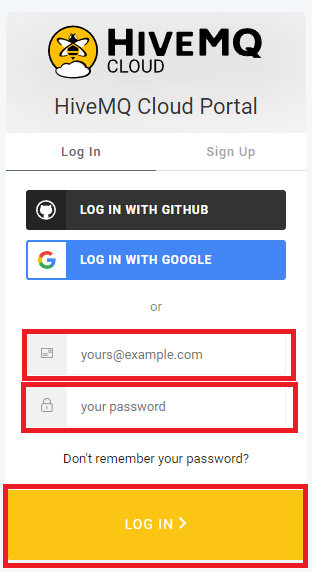
Enter your registered email address and password and click LOG IN .
Click on the bottom right corner MANAGE CLUSTER.

The default page appears to show OVERVIEW page, the Cluster URL, Port, and Websocker Port information shown under Connection Settings are required for programming and will be used later, so remember where this information is located first.

Click ACCESS MANAGEMENT, set Username, password and remember, click ADD. (Add user account), after adding username and password, it will be displayed on the right side.


Add successfully, please remember this Username, and Password, this information will be used to set up the MQTT configuration on the makecode side.

Click CONNECT CLIENT, then it will show that the connection is successful.


Add a subscription topic, the topic name: testtopic/1 will be used later in the programming, the subscribed topics will be displayed in the subscription list.


Please refer to the wiki for the hardware connection section: https://www.elecfreaks.com/learn-en/microbitKit/iot_kit/iot_bit.html
Note: Be sure to use the USB port on the IOT:bit for power, otherwise the wifi module is not powered.
Makecode Programming Practice
Open makecode: https://makecode.microbit.org/#editor
Click "Extensions".

Then type "iot-environment-kit" in the search field of the pop-up screen and click Search, and add the software extensions library.

Click "ESP8266_IoT" after it is successfully added.

Initialize ESP8266 when power on and enter the wifi name and wifi password to connect to the wifi.


Then set the MQTT configuration with scheme selected as TLS, custom clientID, username as the username added on HiveMQ, and password as the password set on HiveMQ.

Click Overview, copy the Host and port on HiveMQ in makecode. Click Overview to copy the Host and port on HiveMQ to makecode.

Next, we test sending the message "hello" to the HiveMQ platform.

Following the above procedure, press button A on the micro:bit to send "hello" to the platform.

Of course, we can also send data from the platform to local, set the Topic on the platform as: testtopic/2, enter the message you want to send to local in Message, and then click Publish to send to local. Similarly the local receiving program blocks should keep the same Topic in the block.

The number 2 is sent locally from the platform and is displayed via an LED matrix on the micro:bit.

Complete program:

Complete program link :https://makecode.microbit.org/_6kgWfF8Tkgbp
FAQ
Q: How can I tell if the current version of IOT:bit supports MQTT?
A: Please check the version number on the back of IOT:bit, IOT:bit V1.6 version supports MQTT protocol, IOT:bit V1.4 and below do not support MQTT protocol.
